Showing posts with label projects-dynamics. Show all posts

Monday, March 24, 2014

Ring of Fire


This is fan art for Ring of Fire, a talk show about corporate crime and legalized corruption. It's simply an animated logo with a generic camera path. The animation transitions to a blue placeholder, which is where the talking heads would go.

I used Maya fluid effects (FE) for the fire. I wanted motion blur because it adds another layer of realism. Without it, animation can look choppy and flat. FE are invulnerable to motion blur, so I had to go through a tricky process to achieve it. I'm reporting the process here because I can't find any tutorials that cover it, and maybe this post will benefit someone. (If this helped you, please say "hi" in the comments.)

There's probably a better solution, but this is the simplest one I could devise. It involves creating a mesh approximation of the FE particles from which you can extract motion data to apply within a compositing program (Nuke, Fusion, AE, etc).

MOTION BLUR FOR MAYA FLUID EFFECT

step 1: Create your fluid object. Ideally, create a fluid nCache for it.

step 1
step 2: Create a polygonal cube, or any other polygonal object. It doesn't matter which. Set the cube's transform vectors to 0,0,0; 0,0,0; 1,1,1

Related Posts Plugin for WordPress, Blogger...

Thursday, October 25, 2012

Wonder Warthog, part 11 - hair & fur

(I'm redesigning, modeling, and rigging Gilbert Shelton's classic cartoon character, "Wonder Wart-Hog.")

"flow it, show it"
The modeling of the head is 95% complete, which means I'll continue adjusting it while moving on to other body parts. It still needs to be rigged, but that comes much later. Rigging, in this case, is making the eyes, mouth, and ears moveable, so they can be animated.

history
Whenever you see a detailed painting or sculpture and wonder "how did they do it," the answer is simply hundreds or thousands of hours: planning, researching, designing, modeling, and other gerunds.


dynamics adjustment

The hair and fur are dynamic. This means the hairs will react to forces like gravity, head movement, and other dynamic objects. The above video shows some of the tests used to see if the hair is moving in a natural way.
... Still much to do.

next: hands ✌
Related Posts Plugin for WordPress, Blogger...

Friday, August 24, 2012

Testing the Waters, ep. 7 - shattered

(experiments in fluid dynamics)
smash, splash
This is my first simulation of destruction physics, using rigid-body dynamics.
The bowl was shattered with one of those randomized shattering operations that most 3D programs have. There's the standard particle simulation to fill the unbroken bowl with water. Then separate explosion forces are applied to the shards and fluid. The water's explosion is about 10% the strength of the glass force. It's not strictly realistic, but it has the look I want.


The video shows the process of adjusting the simulation settings, then the final rendering. If you only want to see the final rendering, skip ahead 45 seconds.
If you want so see it in high definition, you'll have to watch it on Vimeo.
Related Posts Plugin for WordPress, Blogger...

Saturday, February 5, 2011

Testing the Waters, ep. 6 - rigid bodies

(experiments in fluid dynamics)

silly rabbit,
click to enlarge

As I continue to pick up skills, these fluid videos will gradually become more sophisticated; or that's the plan. This is the first experiment that resembles a practical application, i.e., something you might see in a movie or ad.

A rigid body is a non-deforming piece of geometry in a dynamic simulation. This means it can be thrown around by forces and collide with other objects, but can't be smashed, squished, or shmushed. (By contrast, a SOFT body is a deforming piece of dynamic geometry, like something made of fabric, paper, or rubber.)

In this test, the rigid bodies are breakfast cereal Os, a bowl, and a spoon. The bowl and spoon are static rigid bodies. They aren't affected by forces, but contribute to cereal collisions.


cereal sim : filling the bowl

If you have hundreds of objects that you need to arrange into a pile, the quickest way is through dynamic simulation. My first simulation fills the bowl with cereal, and isn't included in the final animation. The second simulation pours the milk.

my epic

The simulations are so time-consuming, that I eventually had to end the adjustments and settle for less-than-satisfactory results.
  • The milk should permeate the cereal more quickly.
  • The cereal shouldn't be thrown around by the milk so easily.
  • The cereal should slowly rise and expand as the milk displaces it.
  • The drops should not bounce off the bowl. They should stick and slide down, leaving a film, if possible.
Right now, I don't have the computing power and time to perfect this, but someday I'll revisit the project to fix the dynamics, and add some fruit slices.
Related Posts Plugin for WordPress, Blogger...

Sunday, January 2, 2011

Testing the Waters, ep. 5 - mixing paint

(experiments in fluid dynamics)

making a mess

The sister project of the immiscible test (ep 4) is this miscible test. Although I'm 80% happy with the results, it's not an ideal solution because the particles in this simulation don't inherit the hue of particles they come in contact with. For example, orange-looking fluid will revert to yellow and red if its particles become isolated. This results in splotchy - rather than smooth - mixing.

Maybe someday a better solution will be available. I'll keep looking.

DOF, before & after

Because of the distance between bowls, this was a good scene for introducing depth of field (DOF). Like motion blur and specular highlights, this is another blur-based post effect that raises the level of realism. DOF is usually the only post channel that I animate, as the focal distance often needs to bounce from object to object.

mixing video

Yes, the floor is moving in this animation. I wanted to see full room lighting in this video without the extra modeling and rendering time, so I used my IBL image for a background. Consequently, it doesn't line up with the geometry. It's just a test, so NBD.
Related Posts Plugin for WordPress, Blogger...

Tuesday, December 21, 2010

Testing the Waters, ep. 4 - oil & water

(experiments in fluid dynamics)

composite

It's time to try interaction between multiple particle systems. This test simulates immiscible fluids, like oil and water.

combined MV data

Because the oil's motion vector and specular data are obscured by the water, each fluid needed to be rendered separately. The data was then combined in a compositer.

video
Related Posts Plugin for WordPress, Blogger...

Monday, November 15, 2010

Testing the Waters, ep. 3 - wetmaps

(experiments in fluid dynamics)

composited rendering

Wetmeps are created when a particle leaves some record of its contact with a surface. Wetmaps can stain a surface, or wash grime from a surface when inverted.

simulation (top) and
map enhancement (bottom)

The wetmaps are generated in the simulator, then enhanced in an image processor. Finally, they're used as a mask to mix dry and wet ground shaders within the rendering software.


Here's my latest blockbuster.
Related Posts Plugin for WordPress, Blogger...

Saturday, October 30, 2010

Testing the Waters, ep. 2 - motion vector pass

(experiments in fluid dynamics)

composite

Because of the render-time motion blur, the previous "episode" took too long to complete. This time around, I tried a motion vector pass, which shaved about 85% off of rendering time.

initial simulation (filling the pools)

After modeling some pools, the next step was to fill them with a torrent of particles. Once the pools were full, I turned the water pressure down to a trickle. Total simulation time (filling + adjustments) amounted to maybe 2000 frames, or around a minute of animation. Only 120 (4 seconds) of those frames were used for the final video.

motion vector

I only concerned myself with two passes this time around: motion vector and specular. The motion vector pass is represented above.  Each additive color - red, green, and blue - corresponds to a different spacial dimension - respectively, the X, Y, & Z vectors. The compositing software uses those first two colors - red and green - to blur pixels along the width and height of an image.

specular pass with highlight filter

The specular pass is used to create a sparkly effect on the water.

steps

This video shows some of the steps of the process.
Related Posts Plugin for WordPress, Blogger...

Friday, October 22, 2010

Testing the Waters, ep. 1 - workflow

(experiments in fluid dynamics)

development stages of a splash:
mesh, raytracing, motion blur

Fluids are often animated with particle dynamics, which are also used to animate fire, explosions, lightning, swarms, and pliable substances (soft bodies). Dynamics - in 3D software - are a technique of animating objects with forces, instead of by keyframing. Dynamic forces include gravity, object/particle collision (normal force), friction, tension, and elasticity.

I've dabbled in fluid systems for years, but now I want to have a more comprehensive understanding of all their permutations. Also, their chaotic nature is a nice compliment to the intense meticulousness of the character-building in my other current project. For now, the software I'll be using is RealFlow with Maya.

video

Here's my first step, which is to just get comfortable with the basics. There are some rendering issues, such as flickering refractions, which I'll have to address down the road.
Related Posts Plugin for WordPress, Blogger...

Friday, August 6, 2010

Wonder Warthog, part 6 - suit colors & rig tests

(I'm redesigning, modeling, and rigging Gilbert Shelton's classic cartoon character, "Wonder Wart-Hog.")

color designs

This part went quickly, despite or owing to my ignorance of clothing design. The image shows the development process, from left to semi-final right. This just shows the colors of the costume. It doesn't take construction, texturing, and detailing into account.

The concept behind the design is to make him less silly and more intimidating, so I removed some of the more ridiculous features of the original: the 2-foot-long cape, the useless eye mask, the panties outside the pants, and the classic painted-on superhero outfit that serves no purpose but to obsess over muscle definition. The new outfit is less satirical and more practical. The character is still dull-witted, like the original, but didn't dress himself this time around.

dynamic clothing test

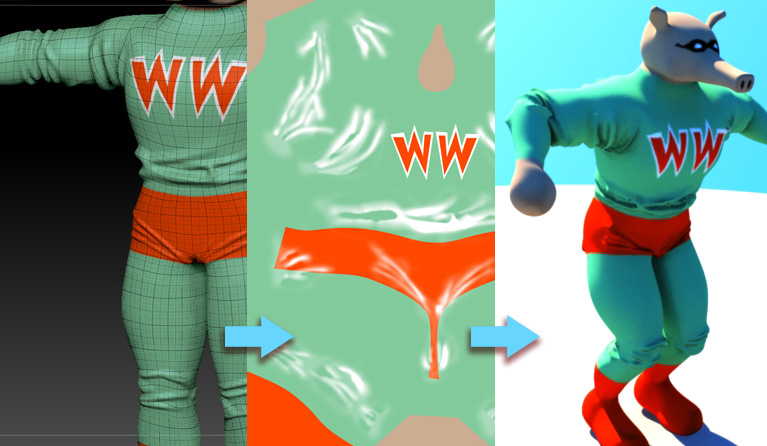
I developed this simple "crash* test" character (above image) to try out unfamiliar techniques, to help decide which direction to take the final character. Besides full-body inverse kinematics (FBIK), Maya's newish Muscle Creator, and Zbrush's impressive UV Master, I wanted to try dynamic soft body clothing. It quickly became apparent that dynamic clothing will not be practical for my final character. Above is the best image I could capture during my night of a thousand crashes*. (Note that my test character is outfitted in the classic Wonder Wart-hog colors. My final WW character will get the new costume.)
* i.e., memory-related software crashes

muscle test

For this test, I only built 3 muscles: biceps (arm), pectoralis (chest), and gastrocnemius (leg). Muscles deform a character's skin in a much more believable way, which is valuable for anatomically-correct characters, but probably unnecessary for cartoony characters.

wrinkles are sculpted, mapped, then test-rendered
(click to enlarge)

I researched different faux-dynamics clothing systems, including driven blendshapes and wire deformers, but driven displacement maps seem the most practical given my hardware resources. It works like this: joint rotations control the intensity of various wrinkle maps. For example, an elbow bend will enable a displacement map of fabric bunching up at the elbow. Seen in the above image, the wrinkles are first sculpted, then transferred to a displacement map and test-rendered.

rigging tests video

Finally, the wrinkle sections are separated and assigned to different joints, using a layered texture and driven keys. The drawback with this technique is that, because they're created with displacement maps, the wrinkle animation cannot be hardware-previewed. It must be software-rendered first.
A similar technique will likely be used for the wrinkles in the face, and possibly the hands and boots.

next: final design, finally
Related Posts Plugin for WordPress, Blogger...

Saturday, February 14, 2009

Astana enhanced, part 10 - site C

(Astana was a hurried video project where a camera flies through 1300 acres of property. Now, to answer my question, "what if we'd been given more time," I'm enhancing the entire neighborhood.)

new version, detail

new version

old version

... More birds, pigeons this time. This time, the flock was generated with a particle system. It's a powerful time-saver.
Enhancements to site C include people, birds, bike, car, tall grass, flowers.

pigeon rig


flock test
Related Posts Plugin for WordPress, Blogger...