 |
| some of the walk styles |
The best reference manual for walks is probably Richard Williams' book, The Animator's Survival Kit, which devotes 110 pages to the subject. Books by Preston Blair and Eadweard Muybridge are also useful.
Almost no video reference was used for these walks, so some of them look a little mechanical. However, the goal of this lesson was to explore various walks, not to perfect them. Video reference can speed up animation production, and make the movements seem more natural. For very cartoony characters, video reference isn't so essential.
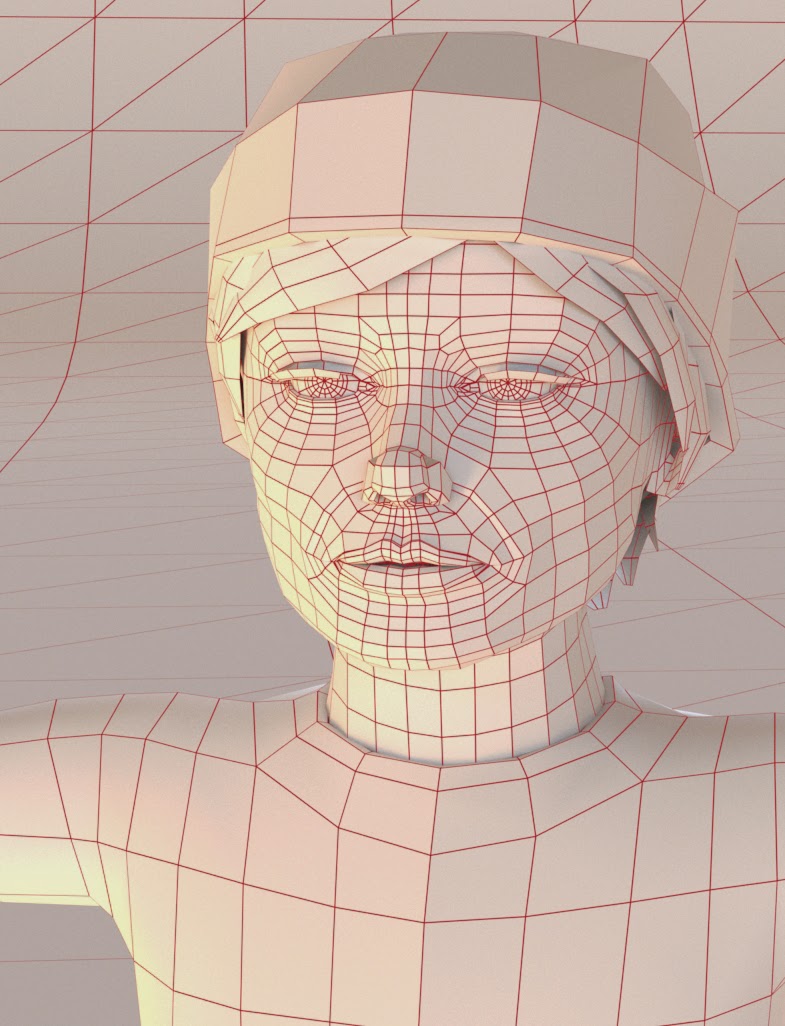
Pallas' face hasn't been rigged yet, so she can't blink or emote through facial expression. In these early lessons, all emotion is expressed by the rest of the body, through posture, pace, amplitude, etc.
Almost no video reference was used for these walks, so some of them look a little mechanical. However, the goal of this lesson was to explore various walks, not to perfect them. Video reference can speed up animation production, and make the movements seem more natural. For very cartoony characters, video reference isn't so essential.
Pallas' face hasn't been rigged yet, so she can't blink or emote through facial expression. In these early lessons, all emotion is expressed by the rest of the body, through posture, pace, amplitude, etc.
walk cycles
NORMAL WALK - This is just a stroll, not determined to go anywhere quickly.
In the video, I included a series that demonstrates how intermediate poses are added to build a smooth walk. This was the most difficult walk to do. For most of the subsequent walks, I just copied this walk to a new animation layer and modified it.
EXAGGERATED WALK - For this walk, everything steps, bends, and swings further. This was for studying arcs, limb twists, weight, and follow-through.
DOUBLE-BOUNCE WALK - This is a cartoonish sort of walk that doesn't exist in nature. It was popular in 1930s cartoons, and thereafter was only used ironically. I tried walking like this and it's exhausting.
SNEAK - This was one of the more fun and easy walks to do. Everything was pretty easy except for the hands, which don't seem completely convincing. There is a ton of drawn reference for this type of walk in Animator's Survival Kit, but I would probably want live-action reference if I was going to make this for a client.
PLOD - It seems I had the same problem with this walk. The arm/hand weight and movement don't look correct. Good video reference would have fixed that quickly. maybe next time
SASHAY - This was a fun and fairly easy walk to do, probably because there is a ton of video reference in the form of fashion shows.
SWAGGER - This is probably just the exaggerated walk, but more aggressive. While making it, I was mostly imagining Popeye walking into a fight. Again, the weight and follow-through aren't exactly right, so video reference would've been helpful.
RUN - The run was pretty easy to do. I mostly used Muybridge photos as reference. I'd like to do more expressive runs someday. This one is a standard fast run.
SKIP - This one was a little difficult and - again - I wasn't sure what to do with the arms.
In conclusion, I learned much. There's more to learn about walks, but I'm moving ahead to study other actions and behaviors.
next: face rigging