Showing posts with label projects-characters. Show all posts

Sunday, March 15, 2015

Actor's Studio, lesson 5 - Pallas walk cycles

some of the walk styles
The best reference manual for walks is probably Richard Williams' book, The Animator's Survival Kit, which devotes 110 pages to the subject. Books by Preston Blair and Eadweard Muybridge are also useful.

Almost no video reference was used for these walks, so some of them look a little mechanical. However, the goal of this lesson was to explore various walks, not to perfect them. Video reference can speed up animation production, and make the movements seem more natural. For very cartoony characters, video reference isn't so essential.

Pallas' face hasn't been rigged yet, so she can't blink or emote through facial expression. In these early lessons, all emotion is expressed by the rest of the body, through posture, pace, amplitude, etc.


walk cycles

NORMAL WALK - This is just a stroll, not determined to go anywhere quickly.
In the video, I included a series that demonstrates how intermediate poses are added to build a smooth walk. This was the most difficult walk to do. For most of the subsequent walks, I just copied this walk to a new animation layer and modified it.

EXAGGERATED WALK - For this walk, everything steps, bends, and swings further. This was for studying arcs, limb twists, weight, and follow-through.

DOUBLE-BOUNCE WALK - This is a cartoonish sort of walk that doesn't exist in nature. It was popular in 1930s cartoons, and thereafter was only used ironically. I tried walking like this and it's exhausting.

SNEAK - This was one of the more fun and easy walks to do. Everything was pretty easy except for the hands, which don't seem completely convincing. There is a ton of drawn reference for this type of walk in Animator's Survival Kit, but I would probably want live-action reference if I was going to make this for a client.

PLOD - It seems I had the same problem with this walk. The arm/hand weight and movement don't look correct. Good video reference would have fixed that quickly. maybe next time

SASHAY - This was a fun and fairly easy walk to do, probably because there is a ton of video reference in the form of fashion shows.

SWAGGER - This is probably just the exaggerated walk, but more aggressive. While making it, I was mostly imagining Popeye walking into a fight. Again, the weight and follow-through aren't exactly right, so video reference would've been helpful.

RUN - The run was pretty easy to do. I mostly used Muybridge photos as reference. I'd like to do more expressive runs someday. This one is a standard fast run.

SKIP - This one was a little difficult and - again - I wasn't sure what to do with the arms.

In conclusion, I learned much. There's more to learn about walks, but I'm moving ahead to study other actions and behaviors.

next: face rigging
Related Posts Plugin for WordPress, Blogger...

Wednesday, November 12, 2014

Actor's Studio, lesson 4 - Pallas body rig

Pallas humanIK rig
Pallas' next step was rigging.

Rigging is the process of attaching deformers to an otherwise rigid model. CGI character deformers are simply the digital counterpart of a puppet's armature: a marrionette's wood rig, a stop-motion character's metal rig, a Muppet operator's hand. Without a rig, these digital and cloth characters are inert.

I'm using Autodesk's humanIK auto-rig. One of its advantages is that it can easily be plugged into motion capture (mocap) data. That is, a real actor's movements are captured on a computer and transferred to an animated character. Mocap replaces an animation technique called rotoscoping, which was first utilized a hundred years ago and is only rarely used today.

For the video below, I plugged some stock mocap data into my Pallas character to see how she'd handle it. These quick animation tests are a good opportunity to detect problems with the model, texture colors, bone placement, and skinning. This video isn't a cinematic-quality rendering, just a quick screen-capture of the modeling space.


to watch in high-definition, view on Vimeo

These mocap files only hold limb, torso, and head animation. If an animator wants the fingers and face to move, he has to add that separately. Consequently, Pallas' face and fingers are stiff throughout this test video. I didn't spend any time correcting the raw mocap data, so - if you look closely - you'll see there are some strange positions throughout: legs penetrating torsos, arms penetrating each other, clavicles not rising with the humerus, etc.

This isn't a project about practicing dynamics, so there will be no dynamic clothing or dynamic hair on this character, or not at this early stage.

next: keyframe animation
Related Posts Plugin for WordPress, Blogger...

Monday, November 3, 2014

Playground, chapter 9 - children edits

children, old & new versions
In the original version of the kids, their hands were mitts with conjoined fingers. This was partly an economic decision and partly a design decision. Conjoined fingers are easier to rig and might look cute if modeled well. However, the hand is the most expressive part of the body, next to the face. If fingers can't move, characterization becomes limited, so I gave the kids new hands with adjustable fingers.

new kid rigs
The previous FK skeletal system has been replaced with a new IK system. With FK (forward kinematics), each bone must be rotated separately in order to move a character into position. With IK (inverse kinematics), moving one bone will influence the position of neighboring bones. This makes it much easier to pose characters, so most of these new poses are a little more nuanced.

Besides changes to the rigs and poses, there were also the usual adjustments to children colors and textures.

Next in this project, we'll be adding or fixing various foreground elements.
Related Posts Plugin for WordPress, Blogger...

Sunday, October 5, 2014

Actor's Studio, lesson 3 - Pallas texturing

Pallas head model (top), shader (bottom), texturing (right)
Textures can evoke tactility, temperature, and odor. A geometric mesh becomes something more relatable.

These textures were created by projecting high-resolution photographs - of skin, hair, and fabric - onto the geometry. This is just a first pass. The textures will continue to be developed, depending on requirements of design, animation, and rendering. For now, they're good enough to continue onto rigging. Again, this is intended to be a simplified model of medium detail, so I avoided painting pores into the bump and specular maps, and other meticulous details.

textures for Pal's head: diffuse, bump, specular, roughness
Pal's head uses a roughness map. Dark areas of a roughness map represent a smoother part of the surface, with sharp reflections and highlights. Bright areas of the roughness map represent abrasive or porous parts of the surface, with blurred reflections and diffused highlights. Some rendering systems use "glossiness" instead of roughness, which is simply the inverse of roughness. IE, you'd need to invert your roughness maps to use them as glossy maps.

Usually, I create a roughness map by simply inverting an instance of the specular image file. For most surfaces, this is probably an acceptable technique. However, it's not specific enough for human faces, which audiences instinctively scrutinize more carefully than other surfaces.

Pallas' hand
Additional textures will be needed, somewhere down the line, for rigging skin and clothing animation, including wrinkling and blushing/pallidity. These textures will be layered images, rigged in such a way that their opacity is increased when a surface is wrinkling or changing color.

next: Pallas body rig
Related Posts Plugin for WordPress, Blogger...

Tuesday, September 9, 2014

Actor's Studio, lesson 2 - Pallas modeling

Pallas model
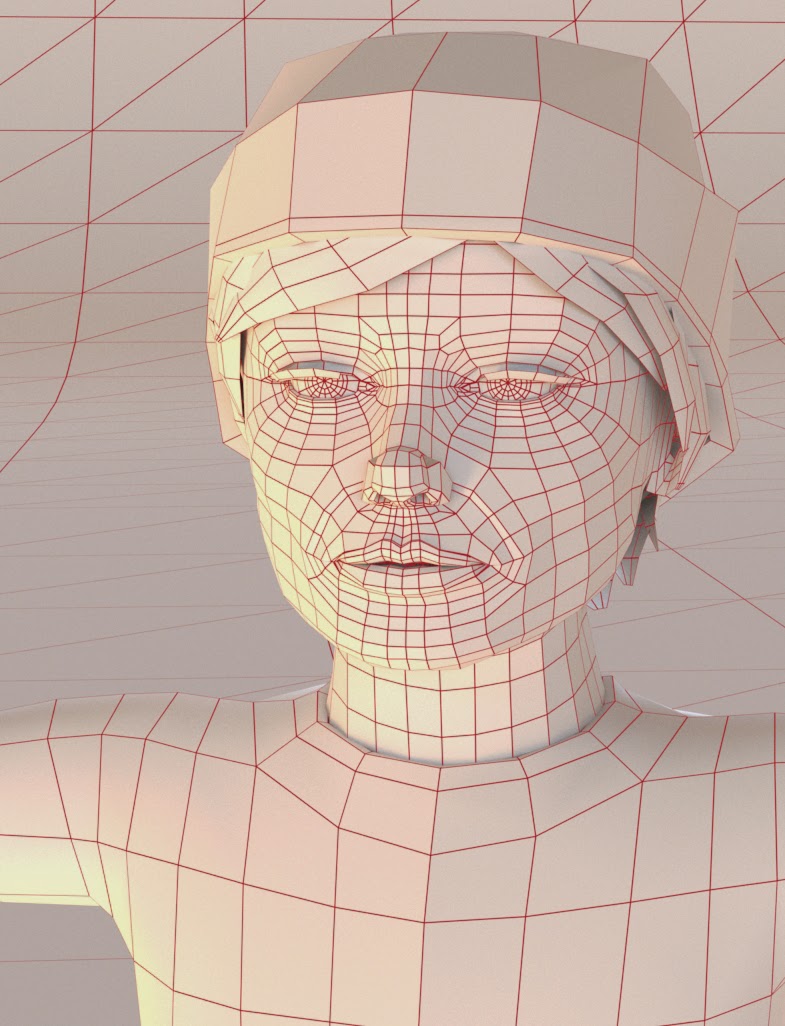
Here is the finished model of Pallas. The purpose of this project is to augment my rigging and animation skill, but it's also an opportunity to become more familiar with facial anatomy, and pick-up the latest modeling and texturing techniques.

This is a character of medium complexity: halfway between a smiley face and a photographic face. Key facial details can be included to make a character more relatable. For example, when you add eyebrows to a smiley face, the range of possible expression is increased. The face that previously could only express happiness or indifference, can now feel anger, sorrow, mischief, relief. Below is a list of key skin folds that can assist in maximizing character depth.

head-modeling details
procurus & depressor supercilii - These are muscles between the eyes that are apparently only used for conveying aggression through the furrowing of the brow. In this area, the polygonal edges follow the direction of these muscles, so that the furrowing will be smooth. (For this project, the plan is to use driven displacement maps to create brow furrows, if that level of detail is required. However, that could change.)

palpebral sulcus - This is a furrow above the eye that holds extra skin, needed to close the eye. The furrow disappears when either the eye closes or the brow is raised. On Asian eyes, this sulcus is hidden by the epicanthic fold. In modeling, the sulcus can easily be created by tucking in one of the edge loops. When the eyes are in a half-open state, the presence of the sulci can help make the character look more relaxed / less alert.

lateral canthus - This is a groove on the outside of the eye where the upper and lower eyelids meet. It's minimized when the eye is opened wide.

nasolabial sulcus - This is a furrow that separates the nose and lips from the cheeks. Its the only skin fold represented in the aforementioned smiley face example (at the corners of its mouth), and beneficial for highlighting smiles and snarls.

oral commissure - This is the corner of the mouth where the top and bottom lips meet. In modeling, it's necessary to tuck the edge loops of the lips into these corners. Otherwise, the mouth looks strange and inhuman.

next: Pallas texturing
Related Posts Plugin for WordPress, Blogger...

Friday, August 1, 2014

Playground, chapter 8 - second version

children, before/after
Nine months after completing the Playground, Anna and I agreed to have another go at this rendering, to create a more interesting version and solve all the problems we have with its quality.

First, we created new hair textures and a new skin shader for all the children, which makes them look less like plastic. I'm using overcast lighting this time, primarily so the children's faces are easier to distinguish.

details from design sketch
Here are some of the other changes we're planning:
  • add more foreground items: animals, clothing accessories, plants
  • articulate the children's fingers, so their hands can be more expressive
  • renovate the barn so it contributes more to the composition
  • model new distant hills with details like buildings, vehicles, and animals
  • create a larger variety of trees
  • paint a new cloudy sky to match the new lighting
Related Posts Plugin for WordPress, Blogger...

Saturday, June 14, 2014

Anna's Doll

Anna's doll
Anna designed and modeled the doll in this image. I modeled the environment and built the rendering, including lighting, textures and materials.

Due to the distressed nature of the architectural surfaces, my attention to detail needed to be more acute than usual. For such a task, photographic reference is useful as a reminder of how things decay.
In my studies, I noted that ...
  • More dirt will find its way into the concave edges of surfaces.
  • The convex edges of a surface are more worn from contact, making them smoother and shinier.
  • More staining and damage occurs near the bottom of a wall.
  • With age, the gaps between wall and floor expand and become jagged. Sometimes these gaps are filled with sealant, usually in a sloppy manner.
It was an interesting though tedious study. I wasn't super meticulous with the detail. I just tried to create enough so that the fakery isn't too obvious.

composite, before & after
For a multipass composite, a 2D rendering from a 3D program is separated into multiple images, then recombined in a 2D program. This provides greater control over the image quality, and results in better volume and spatial depth, and a more precise implementation of simulated lens effects: i.e, more realism.

render passes
 This is my first complex composite in Nuke. My previous Nuke composites just used a motion vector pass and reflection pass. This doll composite uses 10 passes: direct light, ambient light, specular, reflection, refraction, shadows, occlusion, subsurface scattering, z-depth, and masks.

Nuke node graph for doll composite

Related Posts Plugin for WordPress, Blogger...

Thursday, April 24, 2014

Actor's Studio, lesson 1 - Pallas design

Pallas, modeling guides
For my next project, I'm developing my character animation skills and rigging strategies. The subject for this project is Pallas, a girl of around 10 years age with normal proportions: e.g., no gigantic cartoon eyes.

A character animator is an actor who applies his performance to a proxy, similar to what a puppeteer might do; hence the project name, Actor's Studio.

Pallas' appearance will be fairly generic so that she doesn't assume a particular personality type (e.g., debutante, goth girl, etc.). For now, her hair is covered by a hat because I want to focus on simulating human behavior and not be sidetracked by hair physics.

The above image shows some of the guides used within the modeling program. There are guidelines for the clothing and skin exteriors, edge flow, and bone and joint locations. The rib cage and pelvis are noted to avoid torso deformations in those areas.

next: Pallas modeling
Related Posts Plugin for WordPress, Blogger...

Wednesday, January 22, 2014

Wonder Warthog, part 12 - new head

(I'm redesigning, modeling, and rigging Gilbert Shelton's classic cartoon character, "Wonder Wart-Hog.")

NEW head
I did a little research of software and anatomy, and decided to re-engineer the warthog's head.
Some of the topology was improved for more anatomical realism and better deformations (ie, the ease of assuming various facial expressions).
The eyes were raised about a half inch.
I switched to more appropriate rendering software.
Alternate hair software has been employed.

OLD head
Above is the old head, which I last worked on over a year ago.
Geometrically, they are basically the same head, but a few tweaks and some new software resulted in a substantially different look.
Related Posts Plugin for WordPress, Blogger...

Thursday, December 26, 2013

FedEx animation


I few years ago, I did some animation for a series of FedEx industrial videos. This was another low-budget job, so I only had a few days to work on each one.
Reviewing one of these videos a few months ago, I determined that the character animation was interesting enough to justify a rendering enhancement and subsequent publication to my Vimeo account.

frames from original animation
Here are some frames from the original animation that I delivered for rendering 2 years ago. This was my starting point for creating this new version (see video above). The biggest addition is the warehouse interior with delivery trucks.

glow mask, before & after
To add optical effects in the compositing program, 3 passes were employed from the modeling program:
  • a reflection pass to accentuate the highlights
  • a mask for applying glow to the words
  • a mask for applying light-wrap to all foreground elements
Related Posts Plugin for WordPress, Blogger...

Tuesday, September 17, 2013

Playground, chapter 6 - kids

playground kids, studio rendering
These children are the last remaining models needed for our playground project.
Anna designed their hair and clothing. I designed their faces.

deformation skeletons
The children models were given deformation skeletons which allow the head, spine, and limbs to be bent into different poses. Since each character is only being posed twice and not animated, these rigs are very basic.

maps rendered separately
Geometrically, all the children's heads are identical, but each was provided with 3 texture maps to create a unique face.
The diffuse map adds the color.
The specular map determines the amount and color of reflectivity on different parts of the face. Smooth and wet surfaces like the eyes and lips get a brighter color, to create more shininess. Porous surfaces like the skin get a dark color which creates more of a matte surface.
The normal map changes the direction that the lighting is coming from on parts of the face, which results in a mimicry of sculptural detail.

Next, they'll be imported into the playground scene, where they'll undergo final adjustments to textures and poses. Below is a preview rendering test.

dancer preview

next: final rendering
Related Posts Plugin for WordPress, Blogger...

Sunday, August 4, 2013

Falling Skies

eye worm character
I got to work with this cool bug character for the TV show, Falling Skies. My compliments to whoever rigged this beast. It was a fun rig to work with.

My original animation was only 3 seconds long, produced for iPad kiosks at the San Diego Comic-Con. This is a 12-second enhanced version, created for my own pleasure, and will have no commercial application

final storyboard
I didn't create a storyboard for the original job, but made one this time to help determine more precise timing. The purpose of a storyboard is to save time animating and reduce dead-ends.


credit: beautiful background texture photographed by Steve Foster
Related Posts Plugin for WordPress, Blogger...

Tuesday, July 23, 2013

my old Twitter avatar

avatar faces
Half the fun of my Twitter account - where I post designs crafted from obsolete box-drawing characters - has been creating character animation sequences and gradually appending them to my avatar over a two year period, ultimately building a 6 minute performance. Twitter has since banned GIF-animation uploads, and even third-party apps are incapable of uploading lengthy GIF movies. Therefore, I'm switching my avatar to a static image, and housing the old animation here.

It was a fun opportunity to practice and refine my 2D animation timing. At the beginning, by experience in this was scant, but toward the end the work was looking more professional. This will be the end of my drawn animation work for a while. I'll be focusing on 3D animation instead.

Below is a history of the animation production, with abbreviated sequences.

April 2011
 
blink & look around

May 2011

blush

laugh

nap

transform

August 2011

bubble
June 2012

double-take
July 2012

love
July 2013

sing

Below is a video of the entire performance that appeared on Twitter.

Related Posts Plugin for WordPress, Blogger...

Wednesday, July 3, 2013

Playground, chapter 5 - swing

playground detail
Here's the last piece of equipment for our farm-themed playground project: a swingset shaped like a horse, with a cat on its back. Apparently, they are best friends.

deformation skeleton
The heads and swings were modeled in relaxed positions. Then the whole thing was attached to a deformation skeleton, so that rotations of the skeleton's joints determine the character poses. Because this structure will only be posed once or twice, the rig controls are fairly simple.

studio rendering
Below are some of the design stages. The cat was originally designed to be sleeping, but unfortunately looked like an orange blob in test models.


design evolution, by Anna

next: kids
Related Posts Plugin for WordPress, Blogger...

Thursday, October 25, 2012

Wonder Warthog, part 11 - hair & fur

(I'm redesigning, modeling, and rigging Gilbert Shelton's classic cartoon character, "Wonder Wart-Hog.")

"flow it, show it"
The modeling of the head is 95% complete, which means I'll continue adjusting it while moving on to other body parts. It still needs to be rigged, but that comes much later. Rigging, in this case, is making the eyes, mouth, and ears moveable, so they can be animated.

history
Whenever you see a detailed painting or sculpture and wonder "how did they do it," the answer is simply hundreds or thousands of hours: planning, researching, designing, modeling, and other gerunds.


dynamics adjustment

The hair and fur are dynamic. This means the hairs will react to forces like gravity, head movement, and other dynamic objects. The above video shows some of the tests used to see if the hair is moving in a natural way.
... Still much to do.

next: hands ✌
Related Posts Plugin for WordPress, Blogger...

Wednesday, May 16, 2012

Tobia at work, part 2

Tobia's pal
This is the final rendering of the Tobia project, a collaboration between Anna Maria Bonanese and myself. The previous post dealt with the construction of the barn and a few props. This one focuses of the design and construction of Tobia's companion.

mouse forms by Anna
The first step in the mouse design was to research photos of mice and their anatomy. From those, Anna produced these sketches. Silhouettes are used in order to resolve the form. The modeling environment is not the place to resolve rudimentary design issues, so we sketch until we're happy with its shape.

spec drawings by Anna
Then Anna designed these modeling guides.

Related Posts Plugin for WordPress, Blogger...

Friday, May 27, 2011

Wonder Warthog, part 10 - head textures

(I'm redesigning, modeling, and rigging Gilbert Shelton's classic cartoon character, "Wonder Wart-Hog.")

Hello, handsome!
(click to enlarge)

Now the textures have been added, using UV, paint, and sculpt tools from ZBrush. Here’s a Mental Ray test render with roughed-out material settings.

head maps, rendered separately
(click to enlarge)

Currently, the head uses four different map types. The diffuse map holds the color. If the nose is pinker or the eyelids darker, it’s because of that map. The displacement map adds geometric detail at render time: wrinkles, bumps, pores, scars. This map saves me from having to create gigantic, geometrically-dense models, which most video cards can’t handle. The normal map adds further bumpy definition to the surface.

There’s also a specular map that distributes varying amounts of shininess. The eye, nose, and mouth areas are a little shinier than the rest of the face.

 eye & mouth test renders
(click to enlarge)

The head is always created first, to allow more time for scrutinization, refinement, and revision. Other parts of the character don’t need to be so perfect because audiences don’t examine them as closely.

During the rigging stage, I'll be creating another face map layer for animated wrinkles.


production video

This video documents the entire texturing process. The eye texture was created in Photoshop. The rest were done in ZBrush. UVs were mapped using ZBrush’s fantastic UV Master plug-in, and tweaked in Maya.

next: an inordinate amount of hair
Related Posts Plugin for WordPress, Blogger...

Wednesday, December 29, 2010

Wonder Warthog, part 9 - refining the head geometry

(I'm redesigning, modeling, and rigging Gilbert Shelton's classic cartoon character, "Wonder Wart-Hog.")

head geometry, test render

I love doing this, but it sure takes a long time. Ideally, you want a team creating a character this complex.

Above is a test render of the "finished" head geometry. It will certainly require further geometric adjustments down the line, but this is good enough to move it into texturing. If we continue the architecture analogy introduced in the previous chapter, all the walls, floors, and staircases have just been installed.

construction of new topology

At this refinement stage, the first development was overall topology. This means that the edge flow needs to conform to the contours of the underlying muscles and bones, which aids in realism and good deformation during animation.

face areas: blocked out, then refined

The most extensive head modeling is usually done in the mouth, which includes lips, teeth, gums, and tongue. Following that, the neck and the eye area needed the most work. (The ears often need much work, but I did most of that in the blocking stage.)

mouth insides

turntable

This turntable video demonstrates the progress between the rough "blockhead" model and the finished geometry.

There's much more work to be done on the head.

next: texturing
Related Posts Plugin for WordPress, Blogger...