(I'm redesigning, modeling, and rigging Gilbert Shelton's classic cartoon character, "Wonder Wart-Hog.")
This stage is for seeing how the texture maps, fur, and lighting affect the head model, and if the mesh will need to be altered to compensate. This is another design stage to work out the kinks. Perfection is not the goal at this time, so there's going to be some sloppiness.
 color, displacement, and normal maps, respectively
(click to enlarge)
color, displacement, and normal maps, respectively
(click to enlarge)
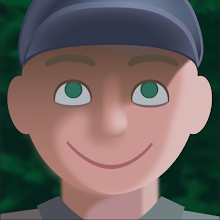
Above are the skin maps, seen combined in the renderings below. The
color map determines the color variation throughout the surface. The
displacement map subdivides the low-poly mesh to add rough detail. The
normal map creates finer textural detail like pores, wrinkles, bumps, and blemishes.
 hairstyling
When fur is added to a mesh, it begins as white rods that jut straight up from the entire surface. Then it must be styled (combed, trimmed, colored) using painting tools.
 fur maps
These are a few attribute maps: hair density, direction, inclination, and length. Light-colored areas create more of an attribute (e.g., long or thick hair), whereas dark areas create less of an attribute (e.g., short or sparse hair). The final head will require maps for additional attributes, including color variation, curliness, and strand thickness.
 final practice fur (click to enlarge)
I eventually arrive at a point where I can't justify further hair work on a practice head. Based on this, I have a pretty good idea of what alterations I'll make for the final head.
next: costume design


 "This former race car driver quit his successful job as a New York City advertising executive one afternoon in 1972 and never returned to the office. Instead, he dedicated the rest of his life to his one true passion - painting."...
 "As a race car driver he set a number of course records throughout California in the early 1960s, driving his beat-up Porsche Speedster against such rivals as Lance Reventlow and actor Steve McQueen. He studied at Brooklyn's Pratt Institute, founded by his great grandfather, Charles Pratt."