 |
| Tobia's pal |
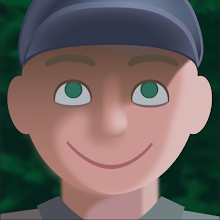
This is the final rendering of the
Tobia project, a collaboration between
Anna Maria Bonanese and myself. The
previous post dealt with the construction of the barn and a few props. This one focuses of the design and construction of Tobia's companion.
 |
| mouse forms by Anna |
The first step in the mouse design was to research photos of mice and their anatomy. From those, Anna produced these sketches. Silhouettes are used in order to resolve the form. The modeling environment is not the place to resolve rudimentary design issues, so we sketch until we're happy with its shape.
 |
| spec drawings by Anna |
Then Anna designed these modeling guides.
 |
| early modeling |
The modeling begins.
 |
| UV layout |
After modeling, the UVs were laid out in such a way to best hide the fur seams. With this layout, the main seam runs down the belly, from nose to tail. Then there's a seam for each of the legs, and at the base of the ears and tail.
 |
| various maps |
UV coordinates allow for the mapping of color and other surface attributes like fur length. For example, fur is commonly shorter around the face and longer on the torso.
 |
| posed rig |
For the model to be posed, it needs a deformation skeleton. I used FBIK (full body inverse kinematics) because it's quick and easy to implement; and because I don't require customized control, as the mouse won't be animated and will only be posed once.
 |
| AO pass |
With the mouse complete, the final rendering is produced. This image is called an ambient occlusion (AO) pass. It's used to add detail and contrast to parts of the rendering.
 |
| final rendering |


No comments:
Post a Comment