
(I'm redesigning, modeling, and rigging Gilbert Shelton's classic cartoon character, "Wonder Wart-Hog.")

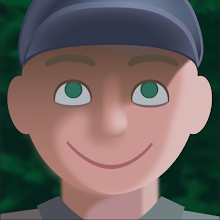
Hello, handsome!
(click to enlarge)
Now the textures have been added, using UV, paint, and sculpt tools from ZBrush. Here’s a Mental Ray test render with roughed-out material settings.

head maps, rendered separately
(click to enlarge)
Currently, the head uses four different map types. The diffuse map holds the color. If the nose is pinker or the eyelids darker, it’s because of that map. The displacement map adds geometric detail at render time: wrinkles, bumps, pores, scars. This map saves me from having to create gigantic, geometrically-dense models, which most video cards can’t handle. The normal map adds further bumpy definition to the surface.
There’s also a specular map that distributes varying amounts of shininess. The eye, nose, and mouth areas are a little shinier than the rest of the face.

eye & mouth test renders
(click to enlarge)
The head is always created first, to allow more time for scrutinization, refinement, and revision. Other parts of the character don’t need to be so perfect because audiences don’t examine them as closely.
During the rigging stage, I'll be creating another face map layer for animated wrinkles.
production video
This video documents the entire texturing process. The eye texture was created in Photoshop. The rest were done in ZBrush. UVs were mapped using ZBrush’s fantastic UV Master plug-in, and tweaked in Maya.
next: an inordinate amount of hair


No comments:
Post a Comment