Saturday, August 28, 2010

Wonder Warthog, part 7 - final design

(I'm redesigning, modeling, and rigging Gilbert Shelton's classic cartoon character, "Wonder Wart-Hog.")

 front view

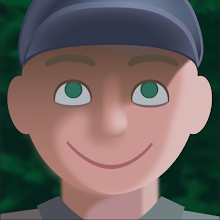
These are the final design illustrations before modeling begins, and they'll act as guides in the modeling program. Within these drawings, I collect any accumulated info that I want to transfer to the character model. This includes my final head design, anatomical data, and costume info. The head (below) was the most challenging component to create, as it had to be invented.

bones (click to enlarge)

First, I drew the bones and muscles. The bone guide is primarily for the placement of joint deformers. They won't actually be modeled, except maybe the skull and mandible as skin deformation objects.

 muscles (click to enlarge)

The muscle guide is used for modeling topology and for the placement of muscle deformers. The muscle labels ("latissimus dorsi," etc.) are to aid in-scene naming during the rigging process, as I don't yet have all the muscle names memorized.

skin and muscle layers,
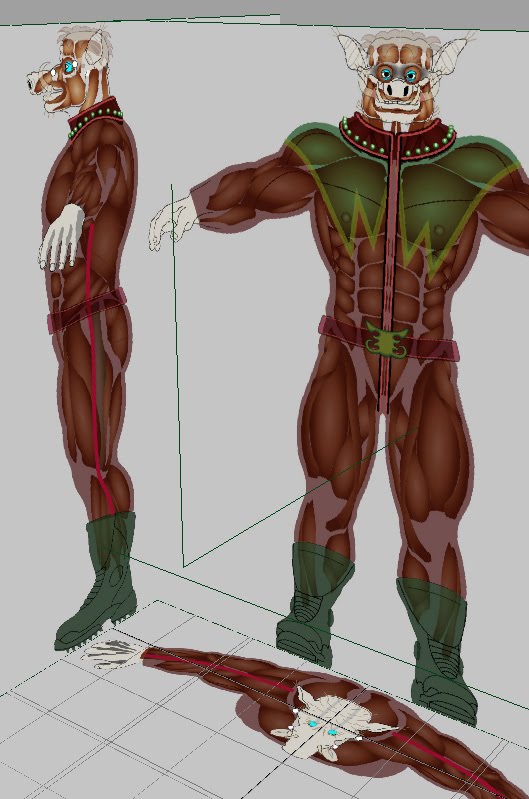
combined on image planes

Here are some of the orthographic guides arranged in scene. Different images - skin, muscle, and bone sets -  will be swapped out depending on whether I'm modeling or rigging.

The contemporary superhero movie suit, which WW's outfit is based on, seems to be inspired by leather and latex bodysuits worn by motorcyclists and fetishists. (The earliest reference photo I found was of Emma Peel, a character from the 1960s Avengers TV series.)

next: modeling
Related Posts Plugin for WordPress, Blogger...

Friday, August 6, 2010

Wonder Warthog, part 6 - suit colors & rig tests

(I'm redesigning, modeling, and rigging Gilbert Shelton's classic cartoon character, "Wonder Wart-Hog.")

color designs

This part went quickly, despite or owing to my ignorance of clothing design. The image shows the development process, from left to semi-final right. This just shows the colors of the costume. It doesn't take construction, texturing, and detailing into account.

The concept behind the design is to make him less silly and more intimidating, so I removed some of the more ridiculous features of the original: the 2-foot-long cape, the useless eye mask, the panties outside the pants, and the classic painted-on superhero outfit that serves no purpose but to obsess over muscle definition. The new outfit is less satirical and more practical. The character is still dull-witted, like the original, but didn't dress himself this time around.

dynamic clothing test

I developed this simple "crash* test" character (above image) to try out unfamiliar techniques, to help decide which direction to take the final character. Besides full-body inverse kinematics (FBIK), Maya's newish Muscle Creator, and Zbrush's impressive UV Master, I wanted to try dynamic soft body clothing. It quickly became apparent that dynamic clothing will not be practical for my final character. Above is the best image I could capture during my night of a thousand crashes*. (Note that my test character is outfitted in the classic Wonder Wart-hog colors. My final WW character will get the new costume.)
* i.e., memory-related software crashes

muscle test

For this test, I only built 3 muscles: biceps (arm), pectoralis (chest), and gastrocnemius (leg). Muscles deform a character's skin in a much more believable way, which is valuable for anatomically-correct characters, but probably unnecessary for cartoony characters.

wrinkles are sculpted, mapped, then test-rendered
(click to enlarge)

I researched different faux-dynamics clothing systems, including driven blendshapes and wire deformers, but driven displacement maps seem the most practical given my hardware resources. It works like this: joint rotations control the intensity of various wrinkle maps. For example, an elbow bend will enable a displacement map of fabric bunching up at the elbow. Seen in the above image, the wrinkles are first sculpted, then transferred to a displacement map and test-rendered.

rigging tests video

Finally, the wrinkle sections are separated and assigned to different joints, using a layered texture and driven keys. The drawback with this technique is that, because they're created with displacement maps, the wrinkle animation cannot be hardware-previewed. It must be software-rendered first.
A similar technique will likely be used for the wrinkles in the face, and possibly the hands and boots.

next: final design, finally
Related Posts Plugin for WordPress, Blogger...